BioXclude Handling
RESOURCES
Minimally Invasive Socket Preservation
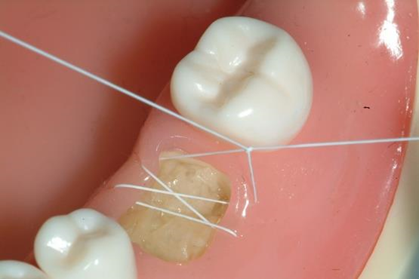
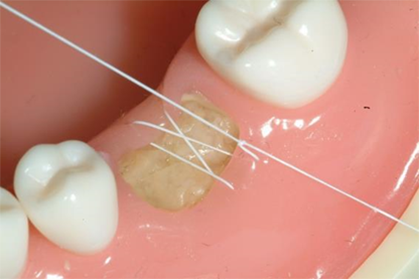
 1. A contained extraction socket should be filled with bone graft to the height of the crestal walls. BioXclude should be placed on top of bone graft material with minimal flap reflection.  2. Place dry, untrimmed 8x8 mm (anterior) or 12x12 mm (posterior) BioXclude using dry forceps. Orientation during placement does not matter. BioXclude may be placed UP or DOWN.  3. BioXclude will hydrate and adapt to bone particulate. Drops of irrigant (sterile saline) can speed up membrane hydration. Damp gauze can be used to help adapt BioXclude over the underlying graft while absorbing excess fluids. |
 4. It is easiest to not manipulate the membrane and instead suture from the inside of the socket (connective tissue side out) to avoid nicking the membrane first.  5. Using this reverse, inverted suturing method in a figure 8 (one for an anterior site and two for a posterior site) will approximate the tissues over the membrane. A PTFE suture is recommended. Continue to blot with damp gauze as needed.  6. Use a wetted instrument (Buser periosteal elevator works well) to tuck the edges of BioXclude as necessary. BioXclude only needs to be 1 mm under the gingival margin. |
Toolkit
1. Adson Forcep
2. Minnesota Retractor
3. Molt #9 Periosteal Elevator
4. Curette
5. Buser Periosteal Elevator
6. Needle Holder
7. Scissor
8. Cotton Forcep
9. SS Medicine Cup (or dappen dish)
10. SS Iodine bowl (for saline)
11. Sterile Gauze
12. Suture
13. Monoject Syringe
14. Sterile Saline
1. Adson Forcep
2. Minnesota Retractor
3. Molt #9 Periosteal Elevator
4. Curette
5. Buser Periosteal Elevator
6. Needle Holder
7. Scissor
8. Cotton Forcep
9. SS Medicine Cup (or dappen dish)
10. SS Iodine bowl (for saline)
11. Sterile Gauze
12. Suture
13. Monoject Syringe
14. Sterile Saline

Welcome to handling, without rules.
Socket Preservation with Flap Elevation
Helpful Hint:
Bone particulate with a mineralized component is commonly used.
Note the necessity to overbulk the buccal defect with bone particulate due to the likelihood of resorption.
Bone particulate with a mineralized component is commonly used.
Note the necessity to overbulk the buccal defect with bone particulate due to the likelihood of resorption.


1. BioXclude is placed last, after all of the bone particulate is placed. There is no need to trim BioXclude - it is safe to touch adjacent tooth surfaces.

2. BioXclude is brought to the site dry. Choose a BioXclude size to extend over all graft material and onto native buccal bone, over the crest and tucked lingually.

3. Use an instrument to anchor BioXclude on the crest. A monoject syringe with sterile saline can be used to hydrate the membrane as needed.

4. BioXclude will naturally adapt and adhere to bone particulate and to adjacent native bone.

5. A damp gauze may be pressed against the site to absorb additional fluid to reapproximate the flap without disrupting the membrane.

6. After vertical releases are sutured, non-primary closure can be obtained using 4.0 PTFE suture, and a reverse figure eight technique (see ‘Suturing Guide’ instructions below).
Suturing
Guide
Reverse or “inverted” sutures pull the tissue both inward and downward. In an open socket this is ideal for membrane retention.
This method also greatly decreases the potential for nicking the membrane.
Guide
Reverse or “inverted” sutures pull the tissue both inward and downward. In an open socket this is ideal for membrane retention.
This method also greatly decreases the potential for nicking the membrane.
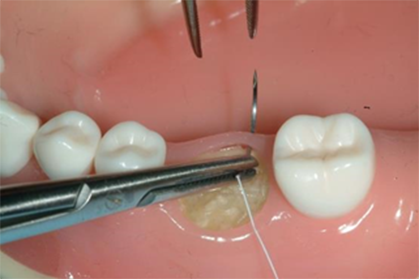
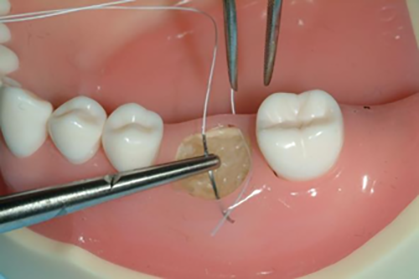
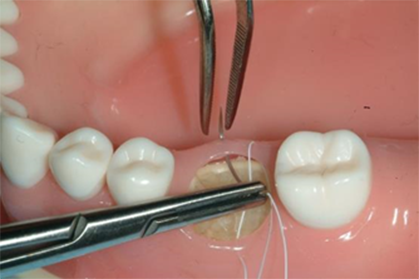
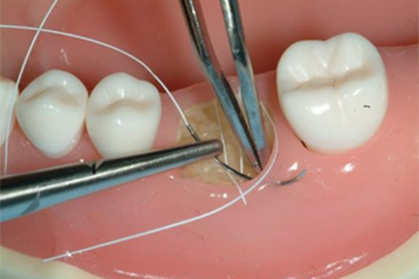
Note: Each pass begins from inside the socket (connective tissue side).
 Size Choices
8x8 mm
12x12 mm
10x20 mm
15x20 mm
15x25 mm
20x30 mm
CHOOSING THE RIGHT SIZE:
No Flap Elevation:
Tuck 1 mm under gingival margin
Flap Elevation:
Cover all graft material and extend onto native bone 3 mm
No Flap Elevation:
Tuck 1 mm under gingival margin
Flap Elevation:
Cover all graft material and extend onto native bone 3 mm
Post-Operative Guidance
When the membrane is exposed to the oral environment:
Appearance During Healing
Using BioXclude with Non-Primary Closure
Using BioXclude with Non-Primary Closure
Variation in healing appearance, including translucent, opaque, and yellowish appearance, are all normal and common.

4 day post-op
Anthony Del Vecchio, DDS

3 day post-op
Dan Holtzclaw, DDS, MS

4 day post-op
Anthony Del Vecchio, DDS

4 day post-op
Dan Holtzclaw, DDS, MS

10 day post-op
Mathew J. Fien, DDS

2 week post-op
Dean Licenblat, BDent, MSc

2 week post-op*
(*pt is a smoker)
(*pt is a smoker)
Vinay Bhide, DDS, MSc

10 day post-op
Vinay Bhide, DDS, MSc
To view a printable version of this handling guide, please use the following link.
BioXclude Handling
RESOURCES
Minimally Invasive Socket Preservation
1. A contained extraction socket should be filled with bone graft to the height of the crestal walls. BioXclude should be placed on top of bone graft material with minimal flap reflection. 2. Place dry, untrimmed 8x8 mm (anterior) or 12x12 mm (posterior) BioXclude using dry forceps. Orientation during placement does not matter. BioXclude may be placed UP or DOWN. 3. BioXclude will hydrate and adapt to bone particulate. Drops of irrigant (sterile saline) can speed up membrane hydration. Damp gauze can be used to help adapt BioXclude over the underlying graft while absorbing excess fluids. |
4. It is easiest to not manipulate the membrane and instead suture from the inside of the socket (connective tissue side out) to avoid nicking the membrane first. 5. Using this reverse, inverted suturing method in a figure 8 (one for an anterior site and two for a posterior site) will approximate the tissues over the membrane. A PTFE suture is recommended. Continue to blot with damp gauze as needed. 6. Use a wetted instrument (Buser periosteal elevator works well) to tuck the edges of BioXclude as necessary. BioXclude only needs to be 1 mm under the gingival margin. |
Toolkit
1. Adson Forcep
2. Minnesota Retractor
3. Molt #9 Periosteal Elevator
4. Curette
5. Buser Periosteal Elevator
6. Needle Holder
7. Scissor
8. Cotton Forcep
9. SS Medicine Cup (or dappen dish)
10. SS Iodine bowl (for saline)
11. Sterile Gauze
12. Suture
13. Monoject Syringe
14. Sterile Saline
1. Adson Forcep2. Minnesota Retractor
3. Molt #9 Periosteal Elevator
4. Curette
5. Buser Periosteal Elevator
6. Needle Holder
7. Scissor
8. Cotton Forcep
9. SS Medicine Cup (or dappen dish)
10. SS Iodine bowl (for saline)
11. Sterile Gauze
12. Suture
13. Monoject Syringe
14. Sterile Saline
Welcome to handling, without rules.
Socket Preservation with Flap Elevation
Helpful Hint:
Bone particulate with a mineralized component is commonly used.
Note the necessity to overbulk the buccal defect with bone particulate due to the likelihood of resorption.
Bone particulate with a mineralized component is commonly used.
Note the necessity to overbulk the buccal defect with bone particulate due to the likelihood of resorption.
1. BioXclude is placed last, after all of the bone particulate is placed. There is no need to trim BioXclude - it is safe to touch adjacent tooth surfaces.
2. BioXclude is brought to the site dry. Choose a BioXclude size to extend over all graft material and onto native buccal bone, over the crest and tucked lingually.
3. Use an instrument to anchor BioXclude on the crest. A monoject syringe with sterile saline can be used to hydrate the membrane as needed.
4. BioXclude will naturally adapt and adhere to bone particulate and to adjacent native bone.
5. A damp gauze may be pressed against the site to absorb additional fluid to reapproximate the flap without disrupting the membrane.
6. After vertical releases are sutured, non-primary closure can be obtained using 4.0 PTFE suture, and a reverse figure eight technique (see ‘Suturing Guide’ instructions below).
Suturing Guide
Reverse or “inverted” sutures pull the tissue both inward and downward. In an open socket this is ideal for membrane retention.
This method also greatly decreases the potential for nicking the membrane.
This method also greatly decreases the potential for nicking the membrane.
Note: Each pass begins from inside the socket (connective tissue side).
Post-Operative Guidance
When the membrane is exposed to the oral environment:
Appearance During Healing
Using BioXclude with Non-Primary Closure
Using BioXclude with Non-Primary Closure
Variation in healing appearance, including translucent, opaque, and yellowish appearance, are all normal and common.
4 day post-op
Anthony Del Vecchio, DDS
3 day post-op
Dan Holtzclaw, DDS, MS
4 day post-op
Anthony Del Vecchio, DDS
4 day post-op
Dan Holtzclaw, DDS, MS
10 day post-op
Mathew J. Fien, DDS
2 week post-op
Dean Licenblat, BDent, MSc
2 week post-op*
(*pt is a smoker)
(*pt is a smoker)
Vinay Bhide, DDS, MSc
10 day post-op
Vinay Bhide, DDS, MSc